| The Following User Says Thank You to GameboyRMH For This Useful Post: | ||
|
|
2010-06-23
, 18:22
|
|
Posts: 46 |
Thanked: 10 times |
Joined on Dec 2009
|
#2
|
I have a touchstone kit already for my Pre. Ive thought about trying this, but I'm too afraid to be the guinea pig. Seems pretty simple after reading some of these blogs though, which makes me wonder whats taking the powermat people so long to come out with some stock sized back plates.
| The Following User Says Thank You to MaltedVomit For This Useful Post: | ||
|
|
2010-06-24
, 00:28
|
|
|
Posts: 4,930 |
Thanked: 2,272 times |
Joined on Oct 2007
|
#3
|
I might just have to do that -- I got the oversize Mugen battery (with extended back cover) during the first iteration, where the camera etc. didn't work. Since they sent us all two of the new covers after they fixed the issues, I've got a spare to mod on.
Of course, the other thing that comes to mind is USB host -- if one routes the USB contacts out to the back, there should be just enough room in the Mugen case for a simultaneous charging and USB setup, with power from either the touchstone, or through the N900's USB port with an obsolete USB charger (the ones with no connection on D+/D-). Might even squeeze in a USB hub, and multiple mini connectors. I wonder what current the touchstone delivers...
Of course, the other thing that comes to mind is USB host -- if one routes the USB contacts out to the back, there should be just enough room in the Mugen case for a simultaneous charging and USB setup, with power from either the touchstone, or through the N900's USB port with an obsolete USB charger (the ones with no connection on D+/D-). Might even squeeze in a USB hub, and multiple mini connectors. I wonder what current the touchstone delivers...
__________________
World's first inductively-charged N900!
World's first inductively-charged N900!
| The Following User Says Thank You to Benson For This Useful Post: | ||
|
|
2011-02-14
, 06:12
|
|
|
Posts: 369 |
Thanked: 167 times |
Joined on Mar 2010
|
#4
|
My buddy gave me his bricked Pre, complete with Touchstone stuff. I've been thinking about trying it, but I do enjoy being able to easily swap the spare battery. And I was really REALLY hoping not to have to solder.
__________________
N900
N900
| The Following User Says Thank You to Descalzo For This Useful Post: | ||
|
|
2011-02-14
, 06:36
|
|
|
Posts: 4,930 |
Thanked: 2,272 times |
Joined on Oct 2007
|
#5
|
Odd coincidence that this thread got bumped just when I was going to hunt it down. Thanks, Descalzo! 
My N900 just took one too many power-cable-assisted dives to the floor yesterday, and now has an IV, if you will, piggy-backed into the battery contacts, and running to my hobby charger.
After my post above, I looked into it, and there's really not room for all the cool stuff I mentioned above. But now that I need a charging system fix anyway, I'm going to attempt the touchstone mod instead of or in addition to soldering the port back down.
So I'm off to buy the hardware; will report back when I get the mod done.
__________________
World's first inductively-charged N900!
World's first inductively-charged N900!
| The Following 4 Users Say Thank You to Benson For This Useful Post: | ||
|
|
2011-02-17
, 17:43
|
|
Posts: 968 |
Thanked: 974 times |
Joined on Nov 2008
@ Ohio
|
#7
|
I'll be keeping an eye here as well. A while back I picked up two touchstone back covers, and a touchstone base when Radioshack had them on clearance, I think ~$20.
It looked like it would be difficult to get the coil and circuit board to fit in the stock N900 cover, and I haven't had time to play with it since.
It looked like it would be difficult to get the coil and circuit board to fit in the stock N900 cover, and I haven't had time to play with it since.
__________________
*Consumer*, not a developer! I apologize for any inconvenience.
My script to backup /home and /opt
Samsung Galaxy S Vibrant, Huawei S7, N900(retired), N800(retired)
*Consumer*, not a developer! I apologize for any inconvenience.
My script to backup /home and /opt
Samsung Galaxy S Vibrant, Huawei S7, N900(retired), N800(retired)
| The Following User Says Thank You to lemmyslender For This Useful Post: | ||
|
|
2011-03-23
, 01:08
|
|
Posts: 692 |
Thanked: 264 times |
Joined on Dec 2009
|
#8
|
Update: There's now a standard for inductive charging:
http://www.energizer.com/inductive/w...explained.aspx
Energizer makes some nice kits. You could buy a door for say, the Blackberry, put its guts into the N900 and have a standard inductive charging solution. Now that these things have been standardized, inductive charging is a much more appealing idea.
__________________
"Impossible is not in the Maemo vocabulary" - Caballero
"Impossible is not in the Maemo vocabulary" - Caballero
|
|
2011-03-28
, 22:30
|
|
|
Posts: 4,930 |
Thanked: 2,272 times |
Joined on Oct 2007
|
#9
|
Originally Posted by Benson

Mod accomplished! 
Odd coincidence that this thread got bumped just when I was going to hunt it down. Thanks, Descalzo!
My N900 just took one too many power-cable-assisted dives to the floor yesterday, and now has an IV, if you will, piggy-backed into the battery contacts, and running to my hobby charger.
After my post above, I looked into it, and there's really not room for all the cool stuff I mentioned above. But now that I need a charging system fix anyway, I'm going to attempt the touchstone mod instead of or in addition to soldering the port back down.
So I'm off to buy the hardware; will report back when I get the mod done.
Pics and detailed description to follow in a bit.
Since the USB port lifted the VBUS trace off the board, and I couldn't locate VBUS anywhere else (except, per the schematics, under one of the EMI covers which I'm not keen to cut into), I am unable to use the N900's USB charging abilities. I had to add a separate 5V Li-ion charging circuit, wired to the battery connector and the Pre circuit. The circuit I used is a fixed 720mA current, so it won't even maintain the battery constant in real heavy use, but it should be adequate for practical use. (I've only had it back together for an hour, so...)
The N900, with its extrafat battery, is a bit heavier than the Pre, but it still hangs on the touchstone in either portrait or landscape, no trouble.
Now I've got to either locate my camera, or maybe borrow a friends iPhone (*spit*) to document it. Will post back.
__________________
World's first inductively-charged N900!
World's first inductively-charged N900!
|
|
2011-03-29
, 02:50
|
|
|
Posts: 4,930 |
Thanked: 2,272 times |
Joined on Oct 2007
|
#10
|
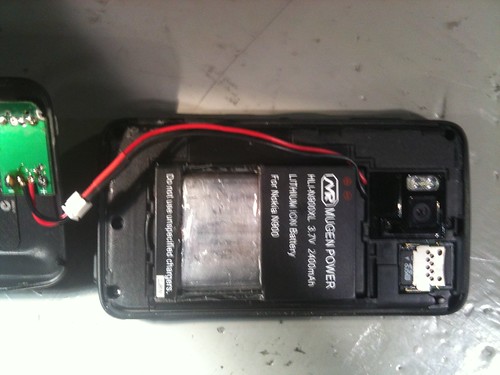
Alright, here's pictures. (Click through to flickr for bigger versions + a few more shots.)
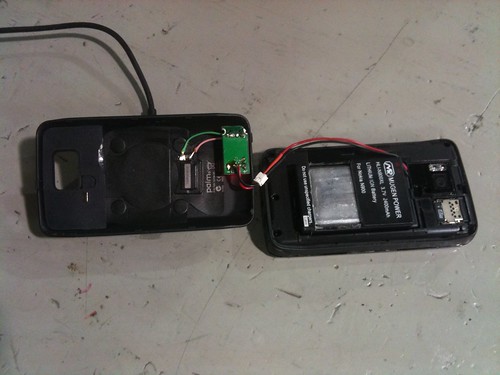
You'll note there's several places I've cut some plastic off one thing or another.
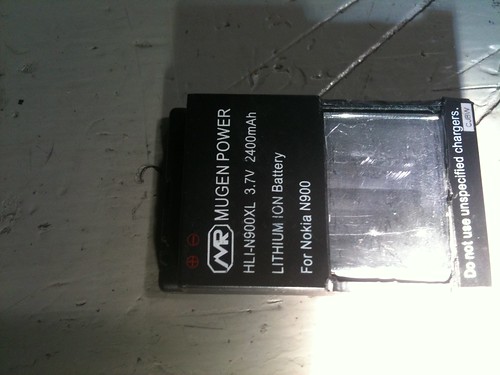
The battery's the most critical -- that shiny metal foil there is the Li-ion polymer cell, bare and exposed to the world. If you damage it while cutting the plastic housing, your battery could quite literally go up in flames then or more likely at a later date, taking your N900 and pocket with it. Also, it's now susceptible to damage if you carry it loose in your pocket, so I can't recommend this mod at all if you routinely swap out batteries instead of charging.
Also, there's a PCB just inside one edge of the battery (far side in that picture, bottom side as installed in the N900) -- you don't want to cut into that either, though it'll more likely result in simple doesn't-work than fireworks..
But you need that room (well, a good chunk of it -- I cut a wider panel than I needed to save exact measuring) to clear the circuit from the Pre cover, so...
What I did is very carefully cut a 45 degree bevel along both short edges of the panel, gradually deepening it until you break through. You can see the remains of that bevel on both the near side and far side, above. Once you've got a clear slit to the interior of the battery, you can see how thick the plastic housing is -- that gives you the knowledge to cut almost through with a hobby knife (or razor-sharp pocketknife), without going clear through and risking damage to the Li-poly cell. Then using a knife with a straight or (better) slightly convex back, you can cut outward through the remaining plastic, taking care not to let the tip score the Li-poly cell.
(Apologies if I'm being long-winded here, but Li-poly safety is a serious matter. Yes, if you don't follow my instructions, but are reasonably careful about it, there's a fair chance everything will be fine, but I did it the safest way I know how, and I can't recommend anything less. We have few enough Maemo fans out there already, no need burning some of us up, right? )
)
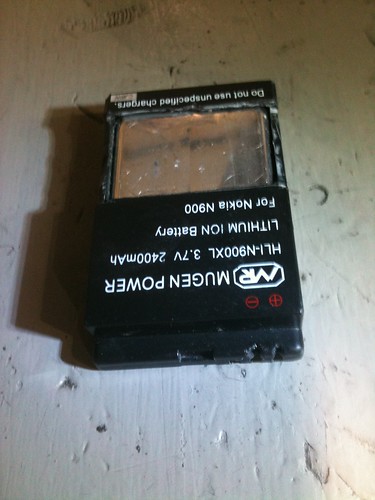
Also, you need a couple notches in the connector region of the battery to clear your wires leading up from the + and - terminals -- you can see those in this end view. I just made a couple 90 degree V-notches the width of the terminal slot, and beveled the top out a bit. You might get by with less (or maybe no notching) if you use fine enough wires, but why waste precious power heating up wires...
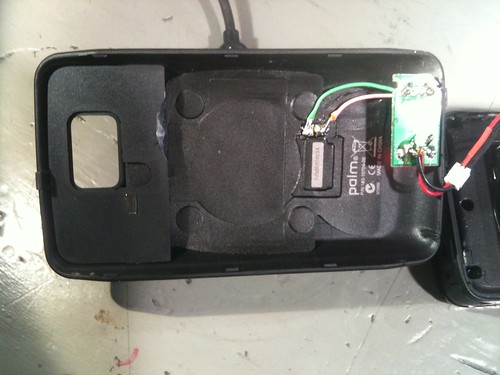
Of course, the other side of those wires will interfere with the cover -- I beveled the relevant region at about 30 degrees, seems to work OK.
Here you can also see how the Pre cover's guts fit in the Mugen cover. Yes, I got it a little crooked. The edges are curled up some (and could be trimmed, if desired, since they don't really stick well enough to sustain that curvature) but the coil, PCB, and magnet targets all fit on the flat section. No comments on my ugly solder job, please. I was trying to minimize heat so I didn't melt
anything plastic, let's pretend that's a good excuse.
Now you can't tell from the pictures, but the soldered joints in the lid are lower than the adjacent raised section of the decal (covers the power-handling PCB), so they don't short out on the battery. However, I put insulating tape on the battery anyway, just to be safe -- removed for the photos, but you know what kapton tape looks like. Might put an extra strip over the solder joints in the cover, too, just to be doubly safe (and to hide my shameful soldering).
The free-floating PCB is a 720mA USB Li-ion battery charging circuit. It goes pretty much where it is, just pushed up at an angle between the end of the battery, the radiused part of the cover, and the N900 body. It's pretty close, but it does fit (even before I notched the corner to make it less hassle). I could probably trim a bit off the sides if it didn't. Right now it's floating, which only increases the hassle of assembly, but after I've run a few days shakedown, I'll be gluing/epoxying it in place. It's got a charging LED on the far side, too, so maybe a hole in the cover + clear epoxy. I used a tiny connector (don't know the exact type) used for R/C batteries to allow complete disassembly, but there's enough room for a Berg strip or similar, and you could even hardwire it with the same routing -- as you can see, there's enough slack to get it this far open.
And here's a closeup of the wire routing around the battery -- nothing special.
Oh, I neglected to get a picture of it, but I doubt the iPhone (*spit*)would have done very good anyway... the charging wires are just soldered straight to the side of the blade contacts of the N900, as far back as possible. This is probably doable without dismantling the N900, given a skilled technician with a fine-tipped iron, but I already had the N900's main board removed from the housing to work on the USB port.
As for charging characteristics -- like I said, only had it for a couple hours. But it should charge fastest with the N900 off (obviously...), and take about 5 hours (from dead) in that case. Should be no problem charging overnight with the tablet running, and should more-or-less keep up or get ahead with normal usage. Won't be as fast as the ~1A charger that ships with it, but faster than charging from a computer's USB port.
And that's it -- world's first inductively-charged N900.
Last edited by Benson; 2011-03-29 at 02:53.

You'll note there's several places I've cut some plastic off one thing or another.

The battery's the most critical -- that shiny metal foil there is the Li-ion polymer cell, bare and exposed to the world. If you damage it while cutting the plastic housing, your battery could quite literally go up in flames then or more likely at a later date, taking your N900 and pocket with it. Also, it's now susceptible to damage if you carry it loose in your pocket, so I can't recommend this mod at all if you routinely swap out batteries instead of charging.
Also, there's a PCB just inside one edge of the battery (far side in that picture, bottom side as installed in the N900) -- you don't want to cut into that either, though it'll more likely result in simple doesn't-work than fireworks..
But you need that room (well, a good chunk of it -- I cut a wider panel than I needed to save exact measuring) to clear the circuit from the Pre cover, so...
What I did is very carefully cut a 45 degree bevel along both short edges of the panel, gradually deepening it until you break through. You can see the remains of that bevel on both the near side and far side, above. Once you've got a clear slit to the interior of the battery, you can see how thick the plastic housing is -- that gives you the knowledge to cut almost through with a hobby knife (or razor-sharp pocketknife), without going clear through and risking damage to the Li-poly cell. Then using a knife with a straight or (better) slightly convex back, you can cut outward through the remaining plastic, taking care not to let the tip score the Li-poly cell.
(Apologies if I'm being long-winded here, but Li-poly safety is a serious matter. Yes, if you don't follow my instructions, but are reasonably careful about it, there's a fair chance everything will be fine, but I did it the safest way I know how, and I can't recommend anything less. We have few enough Maemo fans out there already, no need burning some of us up, right?
 )
)
Also, you need a couple notches in the connector region of the battery to clear your wires leading up from the + and - terminals -- you can see those in this end view. I just made a couple 90 degree V-notches the width of the terminal slot, and beveled the top out a bit. You might get by with less (or maybe no notching) if you use fine enough wires, but why waste precious power heating up wires...

Of course, the other side of those wires will interfere with the cover -- I beveled the relevant region at about 30 degrees, seems to work OK.
Here you can also see how the Pre cover's guts fit in the Mugen cover. Yes, I got it a little crooked.
 The edges are curled up some (and could be trimmed, if desired, since they don't really stick well enough to sustain that curvature) but the coil, PCB, and magnet targets all fit on the flat section. No comments on my ugly solder job, please. I was trying to minimize heat so I didn't melt
 anything plastic, let's pretend that's a good excuse.

Now you can't tell from the pictures, but the soldered joints in the lid are lower than the adjacent raised section of the decal (covers the power-handling PCB), so they don't short out on the battery. However, I put insulating tape on the battery anyway, just to be safe -- removed for the photos, but you know what kapton tape looks like. Might put an extra strip over the solder joints in the cover, too, just to be doubly safe (and to hide my shameful soldering).
The free-floating PCB is a 720mA USB Li-ion battery charging circuit. It goes pretty much where it is, just pushed up at an angle between the end of the battery, the radiused part of the cover, and the N900 body. It's pretty close, but it does fit (even before I notched the corner to make it less hassle). I could probably trim a bit off the sides if it didn't. Right now it's floating, which only increases the hassle of assembly, but after I've run a few days shakedown, I'll be gluing/epoxying it in place. It's got a charging LED on the far side, too, so maybe a hole in the cover + clear epoxy. I used a tiny connector (don't know the exact type) used for R/C batteries to allow complete disassembly, but there's enough room for a Berg strip or similar, and you could even hardwire it with the same routing -- as you can see, there's enough slack to get it this far open.
And here's a closeup of the wire routing around the battery -- nothing special.

Oh, I neglected to get a picture of it, but I doubt the iPhone (*spit*)would have done very good anyway... the charging wires are just soldered straight to the side of the blade contacts of the N900, as far back as possible. This is probably doable without dismantling the N900, given a skilled technician with a fine-tipped iron, but I already had the N900's main board removed from the housing to work on the USB port.
As for charging characteristics -- like I said, only had it for a couple hours. But it should charge fastest with the N900 off (obviously...), and take about 5 hours (from dead) in that case. Should be no problem charging overnight with the tablet running, and should more-or-less keep up or get ahead with normal usage. Won't be as fast as the ~1A charger that ships with it, but faster than charging from a computer's USB port.
And that's it -- world's first inductively-charged N900.

__________________
World's first inductively-charged N900!
World's first inductively-charged N900!
Last edited by Benson; 2011-03-29 at 02:53.
| The Following 13 Users Say Thank You to Benson For This Useful Post: | ||
Cue, foobar, fw190, GameboyRMH, MINKIN2, nightfire, qole, rfeese, vertigodragon, vi_, Wikiwide, woody14619, zvogt | ||
 |
| Tags |
| charging, inductive |
«
Previous Thread
|
Next Thread
»
|
All times are GMT. The time now is 21:32.


http://www.goodandevo.net/2010/06/ho...s-charger.html
It should be possible to do the same mod on other phones including the N900. I don't have any use for inductive charging myself, but I thought I'd mention it and see if anyone's interested.
"Impossible is not in the Maemo vocabulary" - Caballero